
Setting Up ipfw on Mac OS X
Published on 5 Apr 2012 · Filed in Tutorial · 865 words (estimated 5 minutes to read)Using multiple layers of security has long been recognized as a useful strategy in hardening your computers against attack or exploit. In this post, I want to explain how to set up and configure the BSD-level ipfw firewall that is present in Mac OS X. While ipfw is certainly not a security panacea, it can be a solid part of a broader security strategy.
Setting up ipfw on Mac OS X has three basic steps:
-
Create a shell script that launches
ipfw. -
Create a configuration file that the shell script from step 1 uses when launching
ipfw. -
Create a LaunchDaemon in Mac OS X that calls the shell script from step 1 to start and configure
ipfwevery time your Mac boots.
Let’s take a deeper look at each of these steps.
Create a Startup Shell Script
This part is harder than it sounds. At its most basic level, the script only needs to call /sbin/ipfw and a configuration file, like this:
#!/bin/sh

/sbin/ipfw -q /etc/ipfw.conf
I did quite a bit of digging to see if something more than that was suggested, and finally came up with this startup shell script:
#!/bin/sh
# Startup script for ipfw on Mac OS X

# Flush existing rules
/sbin/ipfw -f -q flush

# Silently drop unsolicited connections
/usr/sbin/sysctl -w net.inet.tcp.blackhole=2
/usr/sbin/sysctl -w net.inet.udp.blackhole=1

# Load the firewall ruleset
/sbin/ipfw -q /etc/ipfw.conf
This startup shell script can generally be put anywhere; I chose to put it in /usr/local/bin (which may not exist by default on your system).
With the startup shell script in place, you’re now ready to proceed to the next step, which is perhaps the most involved and detailed step in the process.
Create the Configuration File
The configuration file contains all of the firewall rule definitions for ipfw and is therefore one of the most complicated steps. This complexity is not because the configuration file itself is difficult, but rather because the rules that should be included will vary greatly from user to user and network to network. I strongly encourage you to do your own research to understand what sort of firewall rules are most appropriate in your environment and for your setup.
You can (theoretically) place the configuration file anywhere; I chose to place the file in /etc as ipfw.conf (very original, I know). If you do use something other than /etc/ipfw.conf, then adjust the startup shell script accordingly.
Rather than provide any sort of suggested firewall ruleset here, let me suggest some other sites that provide excellent information on suggested rulesets for ipfw:
Use a custom firewall in 10.5 with ipfw (Mac OS X Hints)
Setting up firewall rules on Mac OS X
Configuring IPFW Firewalls on OS X
From those sites—and there are many others besides just those—you should be able to put together an ipfw ruleset that is right for your network and your environment. Once you have the configuration file created and in place, then you’re ready for the final step: ensuring that ipfw launches automatically when you boot your Mac.
Create a LaunchDaemon
The final step is ensuring that ipfw launches automatically every time your Mac boots. This is accomplished by creating a text file—known as a property list file, or a plist file—with very specific contents into the /Library/LaunchDaemons folder.
Here’s a screenshot of my plist file, named com.apple.ipfw.plist (you can use a different name, like your own domain name, in the filename):
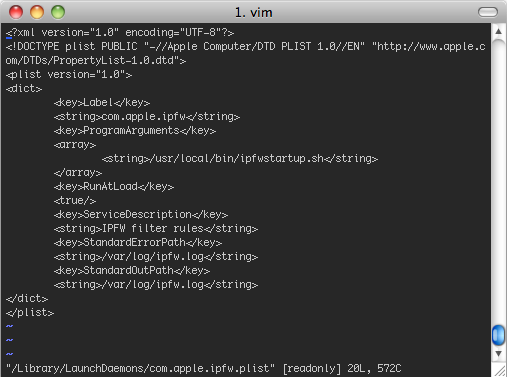
Don’t just copy and paste this file “as is” into your system! You’ll need to customize it to fit your system. Specifically, under the ProgramArguments key, the path to and name of the startup shell script should be adjusted to match the shell script you created earlier. In my case, the script is named ipfwstartup.sh and is found in /usr/local/bin. This startup shell script should, in turn, refer to the ipfw configuration file you created.
I believe—but I could be mistaken—that you’ll need to set ownership of the LaunchDaemon plist file to root:wheel. You can do this using the chown command in Terminal.
Once the plist file is in place, reboot your Mac. Once your Mac boots up and you’ve logged in, fire up the Terminal and run this command (you will need to use sudo if your account has administrative privileges; if your account doesn’t have administrative privileges, you should log in as an account that does in order to test things):
sudo ipfw list
This command should return the list of firewall rules you embedded in the configuration file. If it doesn’t, then go back and double-check your setup. Be sure that the plist file has the correct reference to the startup shell script, and that the startup shell script has the correct reference to the configuration file. You should also check to ensure that you made the startup shell script executable (using the chmod command).
If the command does return your firewall ruleset, then you’re all set.
Note that using ipfw does not in any way prevent you from using other firewalls—such as the built-in application-level firewall in Mac OS X—to further secure your system.
Questions? Comments? Clarifications? Please feel free to speak up in the comments below to add your thoughts.